


Ziroli 92" p-47 build thread

 07-01-2015, 08:39 AM
#28

What? 35 weekend fly-ins and you're taking the time to build in the summer now!?!? You are truly a crazy RC man.
Looking good Sammy. I can't believe with all you got going on you have time to frame up another plane. Amazing.
All the best buddy,
Scott
Looking good Sammy. I can't believe with all you got going on you have time to frame up another plane. Amazing.
All the best buddy,
Scott

") 07-01-2015, 03:56 PM
07-01-2015, 03:56 PM
#30
Yo Scott and Phil,
PLAN, I don't need no stinkin' plan!
Being retired, I just clear my mind of all un-pure thoughts and do what that voice inside my head tells me to do!
I was suppose to go to Chicago's windy city warbird flyin, last weekend but my son's vehicle had to go into the shop and he needed my truck until the repair was done. This week is just a one 'dayer' about 70 miles away on Saturday.
Hey, I still had time to detail out my son's car, today! While the elmer's glue dries for that planking, I had to do something constructive!

===============
Fuse (cont)
Planking (cont)
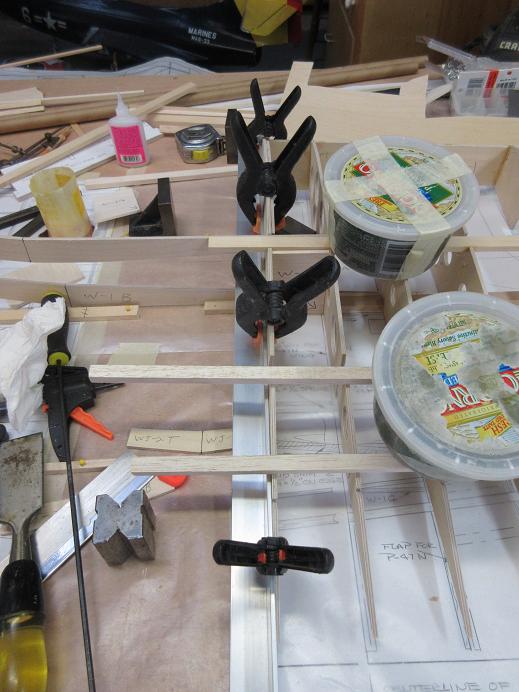
Did the back right side and the top right front.


PLAN, I don't need no stinkin' plan!
Being retired, I just clear my mind of all un-pure thoughts and do what that voice inside my head tells me to do!
I was suppose to go to Chicago's windy city warbird flyin, last weekend but my son's vehicle had to go into the shop and he needed my truck until the repair was done. This week is just a one 'dayer' about 70 miles away on Saturday.
Hey, I still had time to detail out my son's car, today! While the elmer's glue dries for that planking, I had to do something constructive!
===============
Fuse (cont)
Planking (cont)
Did the back right side and the top right front.
Last edited by samparfitt; 07-01-2015 at 04:02 PM.
07-03-2015, 12:15 PM
#33
Fuse (cont)
Planking (cont)
Stringers finished for the bottom.
The new elmer's wood glue has fast tacking qualities (guessing around 4-5 minutes: about the same tacking as 30 minute epoxy).


Back part of belly pan (F-7A/B) installed.

Nick also has a FG belly pan.

Start working on the wing:

Planking (cont)
Stringers finished for the bottom.
The new elmer's wood glue has fast tacking qualities (guessing around 4-5 minutes: about the same tacking as 30 minute epoxy).
Back part of belly pan (F-7A/B) installed.
Nick also has a FG belly pan.
Start working on the wing:
Last edited by samparfitt; 07-03-2015 at 12:58 PM.
07-03-2015, 03:11 PM
#34
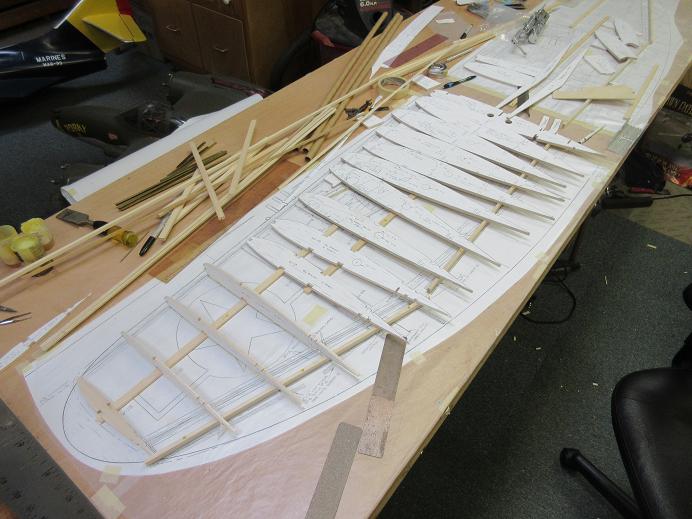
Wing
I'm using the N wing version(bubble version versus my razor back) which is 4" wider, ie, more wing area, instead of the 92", it will be 96". I usually like a 3 piece wing but the gear is too far out so a one piece wing will be built.
As with my 110" P-47, I'll assemble the fuse right side up on my stand and mount the wing from below.
I'm partial to 4 bolts to hold the wing on, versus using a dowel on the LE. It's easier for me to get a tight fit of the wing to the fuse when I use 4 bolts.
I cut the wing template in half and moved them apart about 6" so I can build both wings halves at once (dihedral prevents building them next to each other accurately, at least for me it does!).
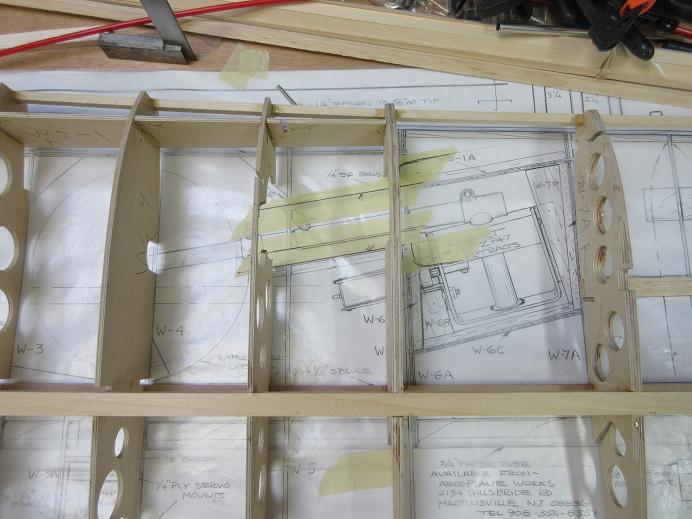
Aircraft ply for all ribs going out to W-7 which is the outer support for the gear.
A 1/2" riser is located along the TE for washout.

Using Darrell's gear so a small mod is needed for his gear. I'll be using a 1/4" thick plate composing of 1/8" thick G10 and 1/8" thick aircraft ply laminated together.
With the P-47 gear location, there are two spars. The one behind the gear is 1/4'X1/2" basswood. The one in line with the gear going out to the wing tip is balsa. Shear webbing to the gear will be 3/32" aircraft ply and balsa sheeting from the gear to the wing tip.
Since the gear is so far forward, the sub LE and LE will be 1/4" square basswood and 1/8" thick aircraft ply, respectively. Some square balsa will be glued to the ply to round off the LE. The ribs are cut pretty thin around the wheel well so the basswood and aircraft ply with keep this area sturdy. With the gear so far out and those big barn door flaps, I don't want that inner wing to be flexing. The gear has a shrink bar on them.


I'm using the N wing version(bubble version versus my razor back) which is 4" wider, ie, more wing area, instead of the 92", it will be 96". I usually like a 3 piece wing but the gear is too far out so a one piece wing will be built.
As with my 110" P-47, I'll assemble the fuse right side up on my stand and mount the wing from below.
I'm partial to 4 bolts to hold the wing on, versus using a dowel on the LE. It's easier for me to get a tight fit of the wing to the fuse when I use 4 bolts.
I cut the wing template in half and moved them apart about 6" so I can build both wings halves at once (dihedral prevents building them next to each other accurately, at least for me it does!).
Aircraft ply for all ribs going out to W-7 which is the outer support for the gear.
A 1/2" riser is located along the TE for washout.
Using Darrell's gear so a small mod is needed for his gear. I'll be using a 1/4" thick plate composing of 1/8" thick G10 and 1/8" thick aircraft ply laminated together.
With the P-47 gear location, there are two spars. The one behind the gear is 1/4'X1/2" basswood. The one in line with the gear going out to the wing tip is balsa. Shear webbing to the gear will be 3/32" aircraft ply and balsa sheeting from the gear to the wing tip.
Since the gear is so far forward, the sub LE and LE will be 1/4" square basswood and 1/8" thick aircraft ply, respectively. Some square balsa will be glued to the ply to round off the LE. The ribs are cut pretty thin around the wheel well so the basswood and aircraft ply with keep this area sturdy. With the gear so far out and those big barn door flaps, I don't want that inner wing to be flexing. The gear has a shrink bar on them.
Last edited by samparfitt; 07-03-2015 at 03:30 PM.
07-05-2015, 10:27 AM
#35
Fuse (cont)
Planking (cont)
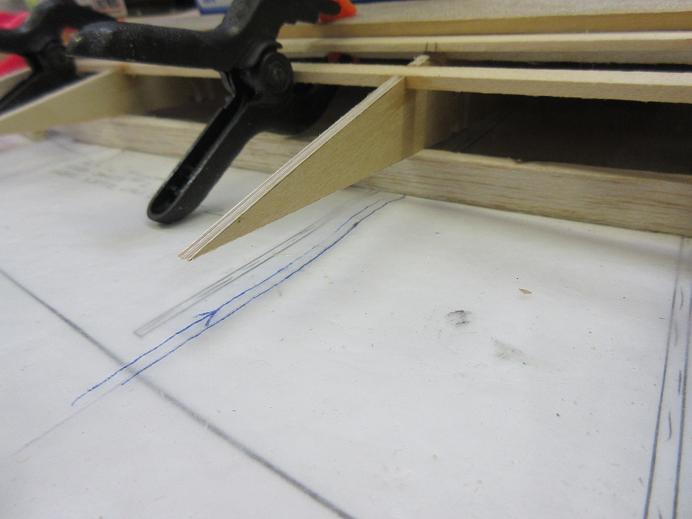
Tail wheel doors:
The back end of the doors are round so some balsa block was used to fill in the area. After sheeting, I'll just cut the 90 degree edge doors out, use the scroll saw to cut the rounded part of the door and then glue back the non-door part into the fuse.

Two full sheets added to each side, starting on the bottom half.


Wing (cont)
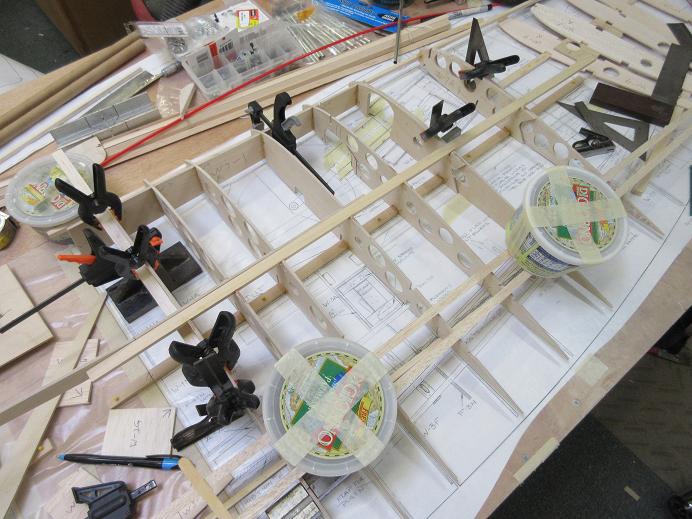
Ribs:
Previously, the outer edges of the ribs were cut and sanded but all the notches still need to be cut.
Lightning holes cut into the aircraft ply using forstner bits. To keep from tearing out on the bottom side, the bit is sunk until a center dimple pops through the bottom, the rib is turned over and the hole is completed.


All ribs and parts will be dry fitted before any gluing. The center rib will be last as it needs dihedral built into it.

Planking (cont)
Tail wheel doors:
The back end of the doors are round so some balsa block was used to fill in the area. After sheeting, I'll just cut the 90 degree edge doors out, use the scroll saw to cut the rounded part of the door and then glue back the non-door part into the fuse.
Two full sheets added to each side, starting on the bottom half.
Wing (cont)
Ribs:
Previously, the outer edges of the ribs were cut and sanded but all the notches still need to be cut.
Lightning holes cut into the aircraft ply using forstner bits. To keep from tearing out on the bottom side, the bit is sunk until a center dimple pops through the bottom, the rib is turned over and the hole is completed.
All ribs and parts will be dry fitted before any gluing. The center rib will be last as it needs dihedral built into it.
Last edited by samparfitt; 07-05-2015 at 10:32 AM.
07-06-2015, 12:08 PM
#36
Fuse (cont)
Planking (cont)
Another full sheet for the bottom area.

One of the ribs was used to outline the waste area on the fuse.

Last narrow strip for the front.

Belly pan outline cut into the sheeting.
Started on the last back bottom of the fuse still needing to be planked.


Wings (cont)
One rib needs to be cut extremely narrow for the wheel well as well as the partial cuts for the flaps. Using lite ply on that rib would have a breakage if you blew on it!


Ribs done to W-7 and dry fitted.

Initially, using a 1/4" riser when gluing the ribs to the bottom spar so the wing sits flush against the spar.
Later, will install the 1/2" riser for the washout.

Planking (cont)
Another full sheet for the bottom area.
One of the ribs was used to outline the waste area on the fuse.
Last narrow strip for the front.
Belly pan outline cut into the sheeting.
Started on the last back bottom of the fuse still needing to be planked.
Wings (cont)
One rib needs to be cut extremely narrow for the wheel well as well as the partial cuts for the flaps. Using lite ply on that rib would have a breakage if you blew on it!
Ribs done to W-7 and dry fitted.
Initially, using a 1/4" riser when gluing the ribs to the bottom spar so the wing sits flush against the spar.
Later, will install the 1/2" riser for the washout.
Last edited by samparfitt; 07-06-2015 at 12:14 PM.
07-07-2015, 04:02 AM
#38
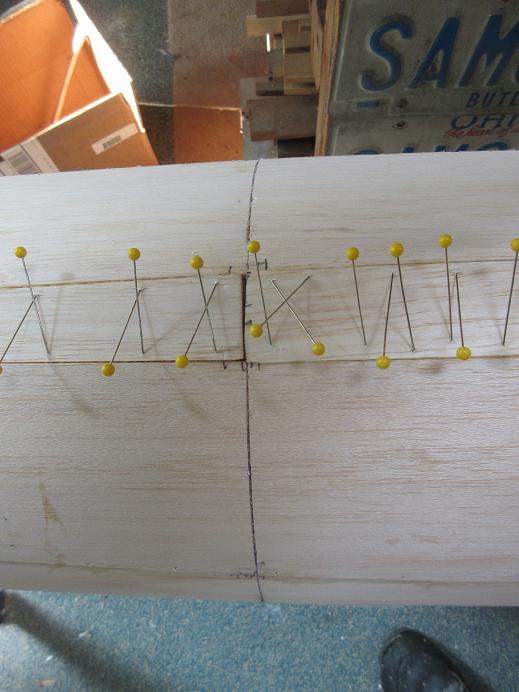
Fuse (cont)
Some 100 grit sandpaper wrapped around a paint stick to smooth out the planking.

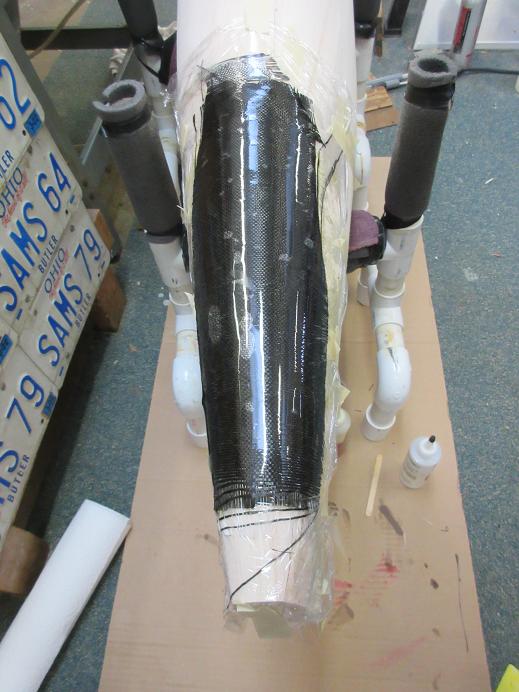
Some saran wrap over the tail door/hatch and CF cloth laid on top finishing off with some Zap finishing resin. The CF cloth has a grain (at least mine does) so it was laid parallel to the fuse length.

Some 100 grit sandpaper wrapped around a paint stick to smooth out the planking.
Some saran wrap over the tail door/hatch and CF cloth laid on top finishing off with some Zap finishing resin. The CF cloth has a grain (at least mine does) so it was laid parallel to the fuse length.
07-07-2015, 06:25 AM
#39
Wings (cont)
Finished sanding all notches on all ribs and dry fit.

Fuse (cont)
Second coat of finishing resin to fill in the CF cloth weave.

I decided not to use the FG belly pan: I thought it easier just to plank that area plus not having to deal with the transition from 1/8" thick balsa to 1/16" thick (or less) FG.

Finished sanding all notches on all ribs and dry fit.
Fuse (cont)
Second coat of finishing resin to fill in the CF cloth weave.
I decided not to use the FG belly pan: I thought it easier just to plank that area plus not having to deal with the transition from 1/8" thick balsa to 1/16" thick (or less) FG.
07-07-2015, 04:01 PM
#40
Fuse (cont)
One layer of CF cloth was insufficient and another layer was put down perpendicular to the first layer. The fibers not wanted to bend completely, I put saran wrap over the cloth and tape the wrap down so it would keep the 2nd layer of cloth in contact with the first layer.
Wings (cont)
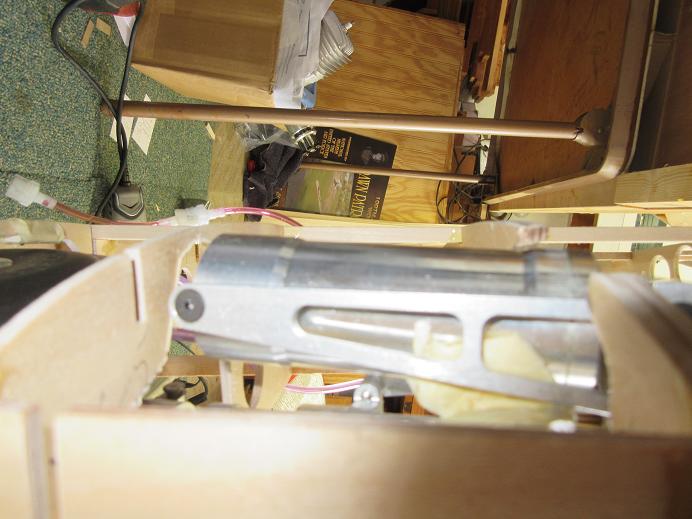
Gear:
Using my old template from the 110" P-47, I sized the 1/8" thick aircraft ply gear mount and attached the gear to it to insure it fits in the wing.
After making some transfer marks to the ribs, the ribs to cut to make room for the gear. In order to check the gear fit, I needed to epoxy the ribs to the main spars and sub-LE.
Ribs W-5 and W-6 had to be moved inward by 3/8" to make room for the gear.
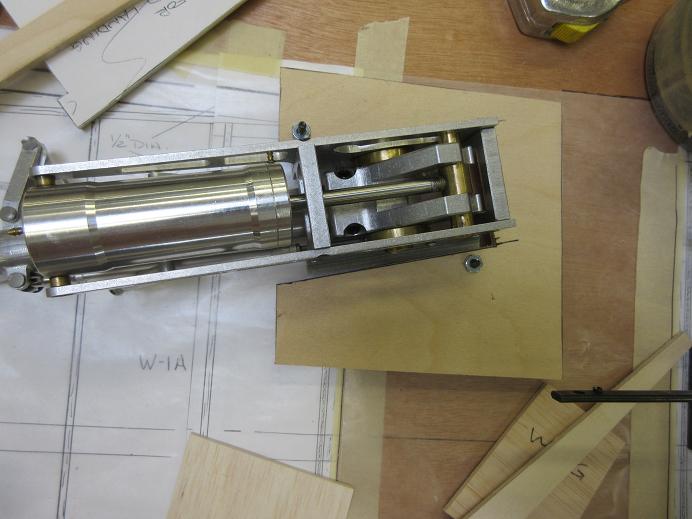
There's not a whole lot of room for the gear.
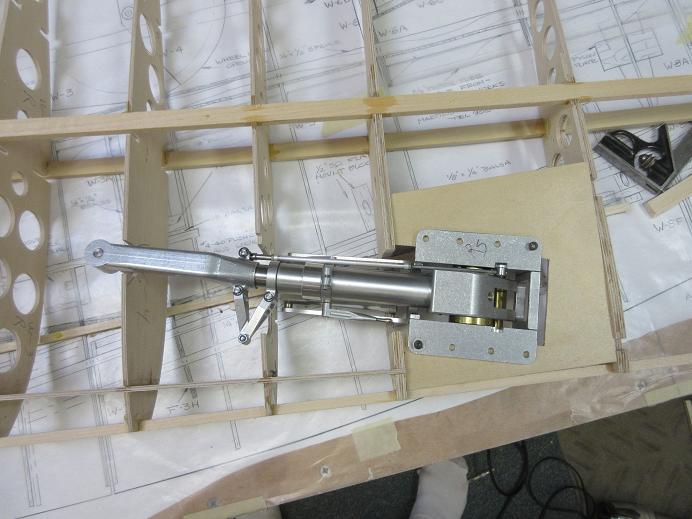
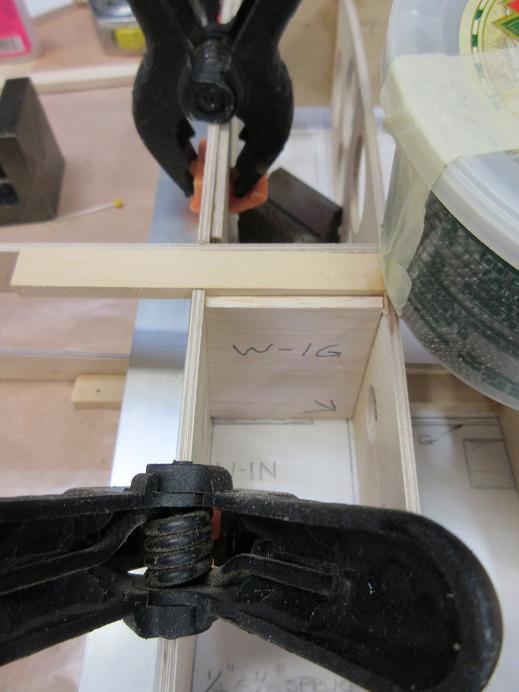
The 1/8" thick aircraft ply LE was epoxied to the ribs and basswood 1/4" square sub-LE. While doing that, I also epoxied W-1N using jigs W-1G/2G to get the proper dihedral.
An aluminum L angle was clamped to W-1N to insure it is straight. Even taking these guide lines, the two mating wing ribs are always off and rarely align with each other. The front or back ribs are where the mismatch usually takes place and I just cut the leading and trailing edge spars, clamp the two ribs together and sister a piece of ply between the cut spars.
Ribs W-5 and W-6 had to be butchered pretty good to fit the gear. I'll probably have to remove part of W-6 narrow strip along the top to make room for the air cylinder. The aircraft ply ribs and LE should provide the needed strength for this weak area, especially since ply will be used to shear web the main spars.
One layer of CF cloth was insufficient and another layer was put down perpendicular to the first layer. The fibers not wanted to bend completely, I put saran wrap over the cloth and tape the wrap down so it would keep the 2nd layer of cloth in contact with the first layer.
Wings (cont)
Gear:
Using my old template from the 110" P-47, I sized the 1/8" thick aircraft ply gear mount and attached the gear to it to insure it fits in the wing.
After making some transfer marks to the ribs, the ribs to cut to make room for the gear. In order to check the gear fit, I needed to epoxy the ribs to the main spars and sub-LE.
Ribs W-5 and W-6 had to be moved inward by 3/8" to make room for the gear.
There's not a whole lot of room for the gear.
The 1/8" thick aircraft ply LE was epoxied to the ribs and basswood 1/4" square sub-LE. While doing that, I also epoxied W-1N using jigs W-1G/2G to get the proper dihedral.
An aluminum L angle was clamped to W-1N to insure it is straight. Even taking these guide lines, the two mating wing ribs are always off and rarely align with each other. The front or back ribs are where the mismatch usually takes place and I just cut the leading and trailing edge spars, clamp the two ribs together and sister a piece of ply between the cut spars.
Ribs W-5 and W-6 had to be butchered pretty good to fit the gear. I'll probably have to remove part of W-6 narrow strip along the top to make room for the air cylinder. The aircraft ply ribs and LE should provide the needed strength for this weak area, especially since ply will be used to shear web the main spars.
Last edited by samparfitt; 07-07-2015 at 04:14 PM.
07-08-2015, 07:51 AM
#41
Fuse (cont)
Tail gear doors/hatch (cont)
I used some of Brian's (dynamic balsa's cockpit kits) clear tracing plastic to outline the doors and hatch and, easily transfer the pattern to the CF doors/hatch. Used a backless razor saw blade to remove the doors/hatch.


Belly pan removed.


Wings (cont)
Darrell called, this morning, and said that is the gear that is suppose to be in Nick's P-47. If the air cylinder was smaller, it would fit easier but he said the large cylinder is needed to power past the shrink bar. I'm guessing that I'll have to sister some wood along the bottom of the ribs, before sheeting, to cover parts of the gear. If I was just now cutting all the ribs, I'd make the bottoms an extra 1/8" thicker.
ps: he said he's going to try to make Fond Du Lac.
Left wing being glued up.
Same stuff applied to left side, moving W-5/6 inward and making sure the W-2 rib is perfectly perpendicular.


Tail gear doors/hatch (cont)
I used some of Brian's (dynamic balsa's cockpit kits) clear tracing plastic to outline the doors and hatch and, easily transfer the pattern to the CF doors/hatch. Used a backless razor saw blade to remove the doors/hatch.
Belly pan removed.
Wings (cont)
Darrell called, this morning, and said that is the gear that is suppose to be in Nick's P-47. If the air cylinder was smaller, it would fit easier but he said the large cylinder is needed to power past the shrink bar. I'm guessing that I'll have to sister some wood along the bottom of the ribs, before sheeting, to cover parts of the gear. If I was just now cutting all the ribs, I'd make the bottoms an extra 1/8" thicker.
ps: he said he's going to try to make Fond Du Lac.
Left wing being glued up.
Same stuff applied to left side, moving W-5/6 inward and making sure the W-2 rib is perfectly perpendicular.
Last edited by samparfitt; 07-08-2015 at 07:56 AM.
07-08-2015, 11:40 AM
#42
Wing (cont)
Alignment:
After the left wing's glue was dry, I clamped the two wing halves, put the left on the plans, weighted it down and checked the right wing's alignment with the right wing plans using a machinist's square The wing's spar was about 3/8" back from the plans. The right wing's TE spars were pulling it out of alignment so I cut them and sistered in some basswood. There's only about a 1/16" gap but big enough to get the right spar back in alignment with the plans.


With the main spar glued to the ribs, the 1/4" risers were replaced with the 1/2" risers.
The flap LE pieces were CA'ed in place.

The aileron LE pieces were also CA'ed. Following the provided notches, the two pieces of 1/8"X1/4" balsa wood would not have been parallel to each other. The notches had to be enlarged to get them parallel; needed for when the hinges are installed.


Wire tube dry fitted:

Had to grind some wood away to get the tail gear out.

Going to 35 meets, one picks up pilot prizes, etc. Testing out some thick, slow bond CA to see how it works.
The thin Zap CA works great on the balsa to balsa pieces.

Alignment:
After the left wing's glue was dry, I clamped the two wing halves, put the left on the plans, weighted it down and checked the right wing's alignment with the right wing plans using a machinist's square The wing's spar was about 3/8" back from the plans. The right wing's TE spars were pulling it out of alignment so I cut them and sistered in some basswood. There's only about a 1/16" gap but big enough to get the right spar back in alignment with the plans.
With the main spar glued to the ribs, the 1/4" risers were replaced with the 1/2" risers.
The flap LE pieces were CA'ed in place.
The aileron LE pieces were also CA'ed. Following the provided notches, the two pieces of 1/8"X1/4" balsa wood would not have been parallel to each other. The notches had to be enlarged to get them parallel; needed for when the hinges are installed.
Wire tube dry fitted:
Had to grind some wood away to get the tail gear out.
Going to 35 meets, one picks up pilot prizes, etc. Testing out some thick, slow bond CA to see how it works.
The thin Zap CA works great on the balsa to balsa pieces.
Last edited by samparfitt; 07-08-2015 at 11:51 AM.
07-08-2015, 02:10 PM
#43
Wings (cont)
Planking (sheeting)
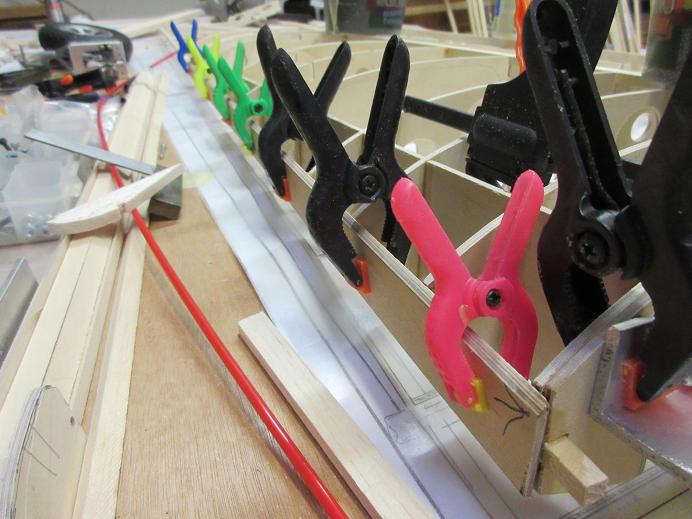
I usual glue up sheets for before and after the main spar but the spar doesn't run the entire distance of the wing, hence no support, so I made up one large sheet comprised of 5 sheets (three 48", a 42" and a 36").

The 48" sheets that I had were bundled together, hence, a better chance that they were all cut from the same wood and will have matching edges, ie, flush to each other. The sheets required a little forcing together but, as long as they don't buckle in the process, that's OK.
Some masking tape was used to secure the edges.
The sheets were laid over the edge of the table, one at a time and glued using wood glue and an acid brush to smooth it out.
Water and a sponge were then used to clean up any excess.


Some 1/8" thick plastic sheets were laid over the planking and some weight added until they dry.

Still got some sheeting for The aeroplane works from the late Mac Gill.

Planking (sheeting)
I usual glue up sheets for before and after the main spar but the spar doesn't run the entire distance of the wing, hence no support, so I made up one large sheet comprised of 5 sheets (three 48", a 42" and a 36").
The 48" sheets that I had were bundled together, hence, a better chance that they were all cut from the same wood and will have matching edges, ie, flush to each other. The sheets required a little forcing together but, as long as they don't buckle in the process, that's OK.
Some masking tape was used to secure the edges.
The sheets were laid over the edge of the table, one at a time and glued using wood glue and an acid brush to smooth it out.
Water and a sponge were then used to clean up any excess.
Some 1/8" thick plastic sheets were laid over the planking and some weight added until they dry.
Still got some sheeting for The aeroplane works from the late Mac Gill.
Last edited by samparfitt; 07-08-2015 at 02:14 PM.
07-09-2015, 09:48 AM
#44
Wings (cont)
Main gear (cont):
Last night, I almost sheeted the top of the wing: fortunately, I didn't since the gear mounts must first be installed.
Dry fitting the gear into the wing for optimum location.
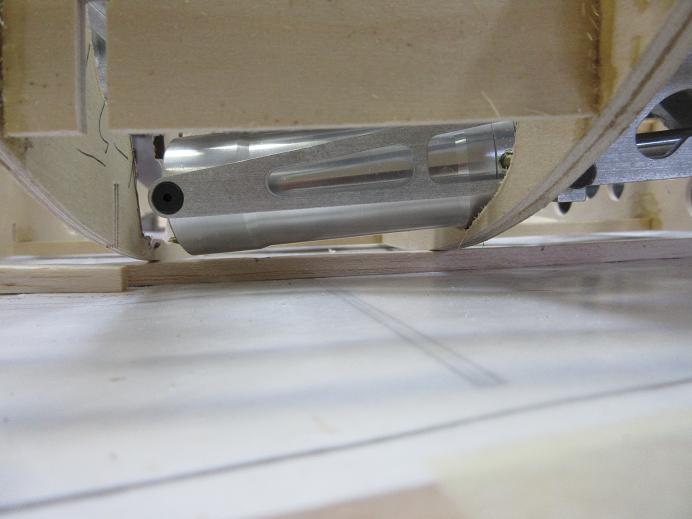
The air cylinder was rotated 180 degrees to get the air nipple away from the top of the rib so I didn't have to butcher the rib any more than needed.

One corner of the frame was sanded down as this part was sticking above the top front of the ribs.

Air lines added along with a 1/16" wide collar made from air line to secure the air line to the nipple.
Also, some BVM lube was added to each side of the air cylinder to lubricate the O rings.


Some basswood stock was notched to hold each corner of the ply plate (with a C clamp) while cycling the gear for optimum location.

I clamped the two wing haves together and laid the wing on two boxes to cycle the retracts.
Down position looks good.

I'll have to sister some balsa sheeting along ribs as part of the oleo is below the ribs, as well as part of the trundle.

The air cylinder just clears the top of the sheeting.


1/8" thick G10 cut on the band saw and epoxied to the 1/8" thick aircraft ply.
Drew outline of ply plate on the ribs before removing it so I can get back to the original position.


Main gear (cont):
Last night, I almost sheeted the top of the wing: fortunately, I didn't since the gear mounts must first be installed.
Dry fitting the gear into the wing for optimum location.
The air cylinder was rotated 180 degrees to get the air nipple away from the top of the rib so I didn't have to butcher the rib any more than needed.
One corner of the frame was sanded down as this part was sticking above the top front of the ribs.
Air lines added along with a 1/16" wide collar made from air line to secure the air line to the nipple.
Also, some BVM lube was added to each side of the air cylinder to lubricate the O rings.
Some basswood stock was notched to hold each corner of the ply plate (with a C clamp) while cycling the gear for optimum location.
I clamped the two wing haves together and laid the wing on two boxes to cycle the retracts.
Down position looks good.
I'll have to sister some balsa sheeting along ribs as part of the oleo is below the ribs, as well as part of the trundle.
The air cylinder just clears the top of the sheeting.
1/8" thick G10 cut on the band saw and epoxied to the 1/8" thick aircraft ply.
Drew outline of ply plate on the ribs before removing it so I can get back to the original position.
Last edited by samparfitt; 07-09-2015 at 10:03 AM.
07-09-2015, 02:56 PM
#45
Wings (cont)
Main gear (cont)
The holes were drilled/tapped through the G10 plus blind nuts were used. The gear was epoxied to the two ribs, taking care that the air cylinder didn't go above the top of the ribs.
Once dry, additional re-enforcement of basswood and ply will be added around the gear mount.


Main gear (cont)
The holes were drilled/tapped through the G10 plus blind nuts were used. The gear was epoxied to the two ribs, taking care that the air cylinder didn't go above the top of the ribs.
Once dry, additional re-enforcement of basswood and ply will be added around the gear mount.
 07-09-2015, 04:39 PM
#47
Thanks, ragtop.
Being retired, I can put in a lot of time on hobbies.
================
Wings (cont)
Main gear (cont)
To be safe, the wings were re-attached and the gear was checked in the down/up position.


The gear plate was boxed in on all 4 sides, using 1/8" thick ply that run from plate to the top sheeting, pretty well insuring the plate won't be moving!

Being retired, I can put in a lot of time on hobbies.
================
Wings (cont)
Main gear (cont)
To be safe, the wings were re-attached and the gear was checked in the down/up position.
The gear plate was boxed in on all 4 sides, using 1/8" thick ply that run from plate to the top sheeting, pretty well insuring the plate won't be moving!
07-09-2015, 06:14 PM
#48
Wings (cont)
Main gear (cont)
Boxed in the bottom of the mounting plate.

Started working on the right gear install.
Rotated the air cylinder and ground off on corner of the frame and some butchering of the ribs.
This side should go faster as the left side took me all day.

Main gear (cont)
Boxed in the bottom of the mounting plate.
Started working on the right gear install.
Rotated the air cylinder and ground off on corner of the frame and some butchering of the ribs.
This side should go faster as the left side took me all day.
07-10-2015, 02:29 PM
#49
Wings (cont)
Main gear (cont)
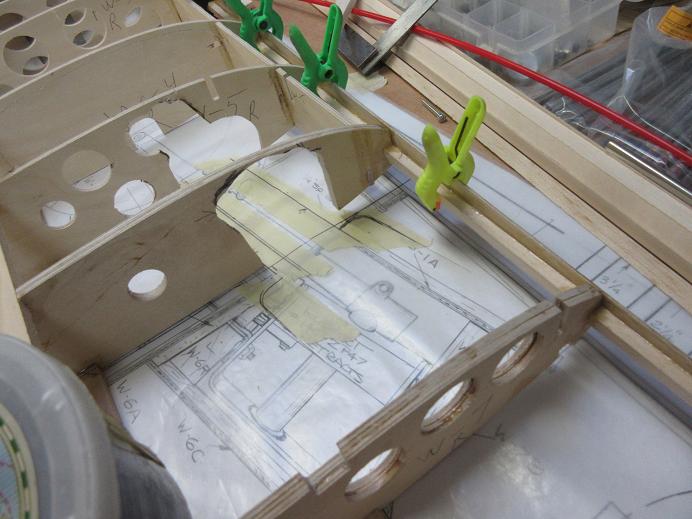
Got the location of the gear mount, cut the G-10 and laminated it to the aircraft ply, drilled/tapped #6 bolts for the gear and checked alignment with wing and also to the fuse.


Epoxied the mount to the wing, boxed in the area and added some CF cloth for additional strength.
The blind nuts are a 1/4" thick so I used a separate piece of 1/4" thick ply for them.


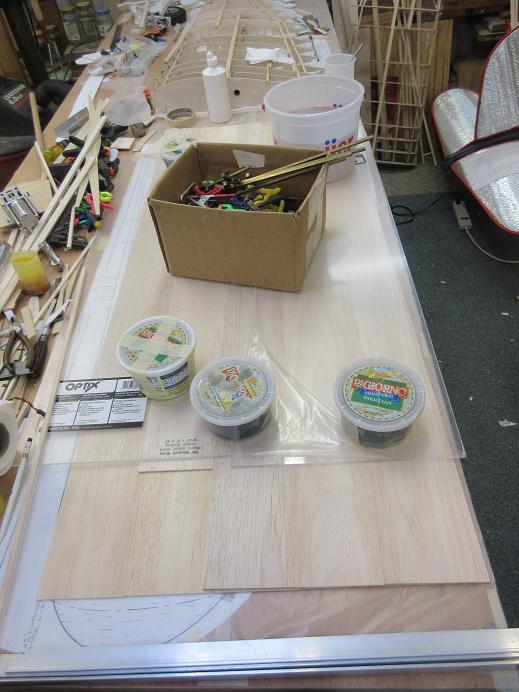
Wing planking (sheeting):
I'm partial to sheeting the top first where I can weigh down the sheeting and wing to the risers, insuring washout is correct and no warping of the wing. For me, it also makes it easier to install the servos.
The large sheet was cut, starting at the TE of the flap and ailerons and then the LE. I'm also partial to cutting/installing the sheeting separately for the flaps and ailerons, giving me nice straight lines for the LE.
The large sheet is kind of nice as it gets the sheeting done quicker, although one must work quickly before the carpenter's glue dries. I transferred all the ribs and spars to the bottom of the sheeting so I could double glue the sheeting and the wing for good glue contact. Lots of "whatever's heavy is around" to weight the wing. Not enough room for clamps on the LE so masking tape 'did the trick'.


Main gear (cont)
Got the location of the gear mount, cut the G-10 and laminated it to the aircraft ply, drilled/tapped #6 bolts for the gear and checked alignment with wing and also to the fuse.
Epoxied the mount to the wing, boxed in the area and added some CF cloth for additional strength.
The blind nuts are a 1/4" thick so I used a separate piece of 1/4" thick ply for them.
Wing planking (sheeting):
I'm partial to sheeting the top first where I can weigh down the sheeting and wing to the risers, insuring washout is correct and no warping of the wing. For me, it also makes it easier to install the servos.
The large sheet was cut, starting at the TE of the flap and ailerons and then the LE. I'm also partial to cutting/installing the sheeting separately for the flaps and ailerons, giving me nice straight lines for the LE.
The large sheet is kind of nice as it gets the sheeting done quicker, although one must work quickly before the carpenter's glue dries. I transferred all the ribs and spars to the bottom of the sheeting so I could double glue the sheeting and the wing for good glue contact. Lots of "whatever's heavy is around" to weight the wing. Not enough room for clamps on the LE so masking tape 'did the trick'.
Last edited by samparfitt; 07-10-2015 at 02:40 PM.
07-11-2015, 06:32 AM
#50
Wings (cont)
Left wing:
While gluing up the sheeting, I could feel the sheeting wasn't making contact with some ribs around the gear mount. I knew these were a little lower than the other ribs so I left the gap versus forcing the sheeting down and have ripples in the sheeting (and be impossible to sand out). After the carpenter's glue dried, I just turned over the wing and filled in the gaps with epoxy. Some holes were cut into the top sheeting for routing wires and also clamping the two wings together for rib alignment and final gluing.


Right wing planking (sheeting):
The entire top was checked for irregularities and sanded smooth.
Some tick marks were made in line with the TE of the aileron and the flap area. Actually, the flap sheeting is an 1/8" past the triangular TE stock for boxing in that area.

The aileron area was cut first.

Then the flap area.


A 1/4" of slop was used along the LE of the wing sheeting.

Ribs/spars transferred to the bottom of the sheeting for double gluing.

Wait 4 hours for the glue to cook.


Left wing:
While gluing up the sheeting, I could feel the sheeting wasn't making contact with some ribs around the gear mount. I knew these were a little lower than the other ribs so I left the gap versus forcing the sheeting down and have ripples in the sheeting (and be impossible to sand out). After the carpenter's glue dried, I just turned over the wing and filled in the gaps with epoxy. Some holes were cut into the top sheeting for routing wires and also clamping the two wings together for rib alignment and final gluing.
Right wing planking (sheeting):
The entire top was checked for irregularities and sanded smooth.
Some tick marks were made in line with the TE of the aileron and the flap area. Actually, the flap sheeting is an 1/8" past the triangular TE stock for boxing in that area.
The aileron area was cut first.
Then the flap area.
A 1/4" of slop was used along the LE of the wing sheeting.
Ribs/spars transferred to the bottom of the sheeting for double gluing.
Wait 4 hours for the glue to cook.
Last edited by samparfitt; 07-11-2015 at 06:41 AM.